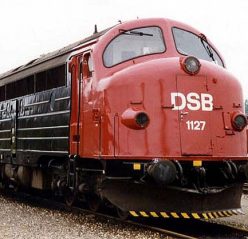
I have bought a Lima MR train. It was already converted to 3-rail (Märklin) track. So mounting the collector shoe is not part of this description.
The most important part is to replace the direction-of-travel switch with a DCC decoder. It must be done properly, so I am mounting the best decoder that I know of: An ESU v.4.
I will also have light on the train. Red tail lights and white front lights changing according to the direction of travel. That is a bit of a challenge, since it is the same lanterns that shall be either white or red. And in addition, it is only the two lower lanterns that shall be red tail lights, whereas all three must act as white front light. But luckily there are LEDs that can switch between red and white. And they even come in a kit including a diagram that is specifically designed for the MR train. I have bought the kit from NiceLed.
While I am at it, I am also adding interior light. It consists of a small piece of a 5 m long LED strip from Jem & Fix.
There are quite a few recipes for this kind of conversion jobs. I have been inspired by Frederik Bendtsen’s page Faldsted and by tho recipes from digitaltog.dk, i.e. Ombygning af Lima MR and Vognlys vha. LED bånd.
The following picture shows my finger pushing the button of an LED tester.
Underneath the tester, you an see two of the LEDs that are going to become head and tail lights. They are small. And there is not much room for them inside the train. That is also the reason why there are no insulated wires but only thin 0,1 mm lacquered copper wire soldered to them. But as it can be seen, such thin wire is sufficient to make the LEDs light up.
Lowest on the pictures, you can see the piece of LED strip that is going to be used for interior lights.
To the right there are some connectors. One set is meant to connect the undercarriage to the upper part of the motor wagon, so that I can disassemble the wagon without ruining anything. The other set is to interconnect the two wagons.
On the picture above, I have been gluing the resistors for the head and tail ligts to the LED strip for the interior light. That way, I can solder everything together before mounting the entity in the wagon.
The next pictures are seemingly swowing some scrap. But it is not quite that bad. The wiring goes in all directions, but the train can drive. The decoder has been mounted.
Below, all LEDs have been glued to the upper part. The LED strip was the easiest part it comes out of the box with double adhesive tape.
I will hide the wiring above the ceiling as soon as the glue for front / tail light LEDs has hardened. And then the train can be put back together. And then the work is done:
Note the connector in the lower part of this picture. It is the connector that was meant for interconnecting the under carriage and the top part. I thought it was smart. But there is not room enough for the motor and the connector. So I chose to keep the motor and cut the connector and solder the wires together instead.
And here is the external and internal lights for the non-motorized wagon. The last few solderings will be made when the glue for attaching the resistors to the LED strip is dry:
Most recipes recommends to use super glue to attach the LEDs, But I have been using normal slower drying glue. And luckily so. For I was placing one of the LEDs a millimeter wrong and therefore it didn’t light up properly. And I was able to take it away and place it better. That would not have been possible with super glue.
The finished result can be seen on the following pictures:
I had thought that the tricky part would have been to work with SMD LEDs and thin copperwire. But that showed out to be the easy part. It is much worse to do proper invisible wiring using 0,14 mm2 wire and small connectors between the wagons. Next time, I have to find even smaller connectors and thinner wire.
Post script:
I have replaced the wires with 0,05 mm2:
They are a lot softer and thereby easier to work with. And the train runs better, since the wires do not prohibit the train from turning. I have made the wires shorter than shown on the picture. They shall be as short as possible for the same reasons as just mentioned.

